Free patterns for mini-stitchers: Easter Bunny
- Jen Hogg
- Mar 27, 2020
- 3 min read
Updated: Mar 28, 2020
Simple patterns to teach children how to sew.

I've been thinking of all the children being off school and all the adults trying to keep them busy! So, here's the first in a series of sewing projects for wee ones to try themselves. The instructions are aimed at being child-friendly.
This bunny is made from scraps of felt, and is hand-stitched with a button tail. The instructions are online and also in a pdf so they can be printed, and are supported by videos of some of the techniques used.
I've deliberately focussed on handstitching in this pattern so your mini stitcher has a chance to get used to handling the fabric - cutting out, aligning the pieces and so on.
Next up is the bag, a simple tote but this time using the sewing machine. The pattern starts to get more complicated so the mini stitcher has to cut two of some parts and one of others, and there are guide lines marked on the pattern pieces. There are also options to embellish the bag, because part of the joy of sewing is making something utterly unique.
Bunny
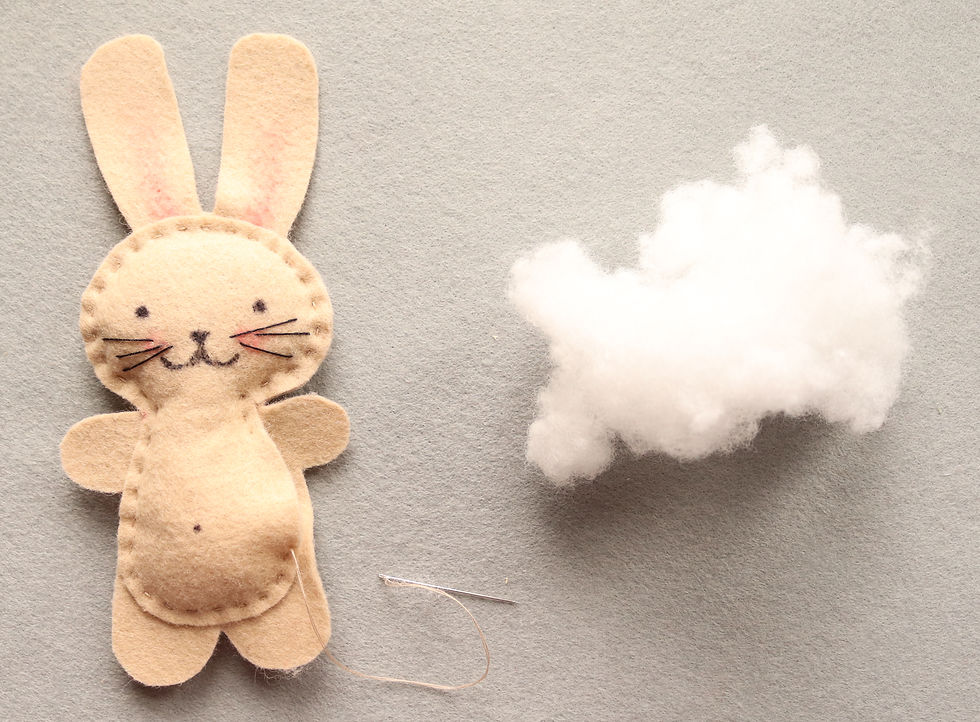
This rabbit is sewn by hand, with details added in permanent marker and a button tail. An adult should check that the button is securely attached to avoid any choking hazard. Pattern to be printed at 100% (no scaling)
Click here for pdf pattern and instructions

What you will need
· Felt for the bunny, at least 15cm x 20cm, and matching thread
· A button for the tail, about 1.5cm or 2cm wide
· A black permanent marker to draw on the eyes
· Some dark thread for the whiskers
· A red or dark pink colouring pencil
Some stuffing
And of course the paper pattern!

Cutting out the pattern

Print the pattern and carefully cut out round the bunny shapes.
Put the pattern shapes on top of your felt and draw round them, then cut them out. You can draw round the pattern pieces with a felt tip pen. When you cut out the fabric, try to cut right beside the pen line so that you don't have any pen on your bunny shapes once you're finished.
Tip: if you use a felt tip pen which you can rub out - like a Frixion pen - you can ask an adult to iron the bunny pieces and any pen lines will disappear.


Making the bunny face

Make the face first. Draw on the eyes, nose and mouth with the permanent marker.
You can use the face on the paper pattern as a guide for where the eyes and nose should go, but it’s not very important, all bunnies are slightly different and yours will have a unique face.
Use the colouring pencil to add rosy cheeks. You can also add some colour to the ears.
Tip: try it out on a scrap bit of felt first! And it's usually easier if you dip the pencil in a little bit of water


Sew the whiskers on with dark thread.
Tie a knot at the end of your thread.
Push the needle through from the back of the bunny to the front, where you want the first whisker to start.
Stitch 3 whiskers, then make your needle dance on the spot! Sew three tiny stitches on top of each other on the back of the bunny to finish off.
Adding the tail

Sew the button onto the bunny’s bottom! It’s much easier to do this before you sew the two sides of the bunny together.
Tip: It won’t matter if your stitching isn’t very neat on the other side of the felt because that’s going to be hidden inside the bunny anyway.
Sewing the bunny together
Lay the two sides of the bunny together and hold them in place with two safety pins
Start beside one arm and use little stitches to sew right round the head and the tummy, stopping when you’re 2cm away from where you started. Don’t cut your thread yet though.
Put a little bit of stuffing inside the bunny’s head and tummy. You won’t need very much. Wiggle it into place until you like the look of the bunny.
Then finish off your stitching.


Please ask an adult to share photos of any bunnies with me on Instagram with #jenerates. I'm really looking forward to seeing them and I'll repost as many as I can on my Instagram stories.
Click here for a pdf version of these instructions.


Comments